Kimi Code is the agent, not a restriction to Kimi models. With a third-party provider, your configuration chooses the model. This article covers the current CLI.
Checked against official docs · 2026-11-08
Have these three details ready
With your app already installed, open Self-service on this website and sign in. Create or view your own API key, copy the API address shown there, and copy an exact model ID from Models and pricing. A website homepage, account password or marketing name is not a substitute. Check both account balance and key allowance.
API_HOST, YOUR_API_KEY and YOUR_MODEL_ID below are placeholders: replace each before use. Follow this article on whether to keep /v1; do not append /chat/completions or /responses. Examples do not connect automatically or contain your key.
1. Check version and file location
Run kimi --version. The current file is ~/.kimi-code/config.toml, or %USERPROFILE%\.kimi-code\config.toml on Windows. Older versions may use ~/.kimi; consult the docs for your installed version rather than editing both.
2. Add provider and model
Merge the example below. provider = "my_api" must match [providers.my_api]. my-model is a local alias; model is the actual platform ID. The 32768 context value is an example, not a model specification: adjust it to confirmed limits.
Field diagram · not an app screenshot
type
openai / openai_responses
base_url
https://API_HOST/v1
model
YOUR_MODEL_ID
api_key_env
MY_API_KEY
Configuration example
Keep a copy of your current file first. Update matching entries rather than adding duplicates, and preserve unrelated settings. Do not share a configuration or screenshot containing a real key.
api_key_env = "MY_API_KEY" explicitly reads that environment variable. Set it below, run kimi, then use /model to select my-model. /login signs into the official service and does not configure this platform.
When the configuration uses MY_API_KEY, set it in the same terminal from which you start the app. Enter your real key only on your computer. This example shows the syntax; the variable lasts for that terminal session.
macOS / Linux terminal
export MY_API_KEY="YOUR_API_KEY"
kimi
Windows PowerShell
$env:MY_API_KEY = "YOUR_API_KEY"
kimi
4. Choose the format
type = "openai" uses Chat Completions. Change to "openai_responses" only after confirming that route for your model. Both examples retain /v1 in the supplied platform address.
5. Declare supported thinking levels
Recognized models usually get automatic capabilities. For an unrecognized alias, add capabilities = ["tool_use", "thinking"] under [models.my-model] only when supported. Declare support_efforts and default_effort from real capabilities; for a low/high model, use support_efforts = ["low", "high"] and default_effort = "low". A declaration cannot add a capability to a model.
Once low is confirmed for this model, add the separate [thinking] section below to select it. Change effort to another declared value when needed. A global effort overrides the model’s default_effort. Save, run /reload in an idle session, then send a test message.
[thinking]
enabled = true
effort = "low"
Check 1: receive a reply
Create an empty test folder, choose it as the workspace and start a new chat. Confirm the new provider and model are selected, then send the prompt below. A normal reply without an error confirms basic connectivity, not every agent feature. Tests incur normal API usage.
Reply only: Connection successful.
Expected: the app displays “Connection successful.” If you see a login page, an error or endless loading, use the checks below before sending again.
Check 2: read a real file
In that test folder, use a text editor to create hello.txt containing “API connection test 27”. Save it, then send the prompt below. If permission is requested, allow reading only this test folder.
Use the file-reading tool to open hello.txt in the current workspace and tell me its contents. Do not change any files.
Expected: a visible tool execution reading hello.txt, followed by an answer containing API connection test 27. A text answer alone is not evidence of a tool call. You may remove the test folder afterwards.
Troubleshoot by symptom
401 / Invalid API key
Check that the address and complete key belong to the same service and that the key is active. Never send support a full key.
404 / model not found
Check /v1, the exact model ID and the API format. A listed model is not a guarantee of support for every format.
429 / quota / balance
Check balance, key allowance and request rate; follow the returned error. More thinking effort cannot fix a quota problem.
Chat works but files cannot be read
Check model tool support, workspace permissions and the tool execution error.
No effort selector
Check capability declarations, the model and client version. Thinking support does not necessarily include adjustable effort.
Official references and scope
Configuration checked on 2026-11-08. Menus may change with updates; use these official references to verify details. Use the current connection information provided by this platform.
Already have DeepSeek Harness installed? Follow the screenshots to connect your API, choose a model and thinking level, receive a first reply, and try a tool.
Choose an installed tool. Harness includes platform-tested screenshots; the other guides provide steps checked against official docs, field diagrams and verification tasks. CC Switch manages configuration; you still run an actual agent.
The complete, current API address supplied by the platform. The website homepage is not necessarily the API address; use the connection information or ask support.
Your own API key, with available account balance and key allowance. Treat the key like a password: do not share it or include it in screenshots.
What do the setup fields mean?
API address
Tells the app where to send requests. Copy the complete address, including any path supplied with it.
API key
Your credential for using the service, linked to the relevant usage allowance.
Model ID
Selects the AI that handles the task. Fetch the available models, then choose one from the returned list.
API format
Specifies how the app packages its requests and how the platform packages its replies. The next section explains the choices.
First, understand what you are connecting
Suppose you ask: “Read this order, calculate the total, and save the result.” Several parts work together.
Harness: the agent app you operate
You enter requests, select a folder, and watch progress here. When the model asks to use a tool, Harness runs it with the required permission and returns the result to the model.
The model: understands and decides
This guide uses DeepSeek. The model does the reasoning; Harness supplies tools such as reading and writing files.
The API platform: provides model access
Harness sends requests using the platform address and your key. You can check your balance and usage on the platform.
What do the setup fields mean?
API address
Tells the app where to send requests. Copy the complete address, including any path supplied with it.
API key
Your credential for using the service, linked to the relevant usage allowance.
Model ID
Selects the AI that handles the task. Fetch the available models, then choose one from the returned list.
API format
Specifies how the app packages its requests and how the platform packages its replies. The next section explains the choices.
Chat Completions or Responses: which should you choose?
They are two ways to format communication, not two models. Think of describing the same task in chat messages or filling in a task form. Both sides must understand the format.
API format
Plain-language explanation
Harness option
OpenAI Chat Completions
Organizes the conversation as messages: what you said, which tool the model requested, and what the tool returned.
openai-completions
OpenAI Responses
Uses separate types of records for text replies, tool calls, and tool results, so the app can handle each part of a task.
openai-responses
OpenAI in the name refers to the interface format. If you select the DeepSeek model in this guide, DeepSeek still answers. Choosing an OpenAI format does not turn it into a GPT model.
Four common questions
Will Responses make the AI smarter?
Changing the format does not upgrade the model. Apps and models may support each format differently, so results depend on the combination. This test did not establish which gives better answers.
Can Chat Completions do more than chat?
Yes. In Harness, we completed a file read, calculation, save, and read-back check. Harness tools perform the actions; the model uses the results to continue.
Do I need Responses to adjust thinking effort?
No. Both formats accepted effort requests for this model. You still need to enable the model’s effort levels in Harness, as shown in step 6. Changing formats does not enable the menu.
Should I choose Chat Completions in every other agent app?
Follow the guide for that app and model. These results apply to the tested Harness and DeepSeek combination, not every tool or model.
Anthropic Messages
Anthropic Messages is a third format commonly used by Claude Code. It is a message format, not a model. That client appends /v1/messages to the root, whereas the OpenAI-compatible examples include /v1 in their base URL. Our Codex guide uses Responses, the Harness example starts with Chat Completions, and Kimi Code follows its configured type. Follow the tool guide and confirm model support; changing format does not add tools or effort levels.
Already have DeepSeek Harness installed? Follow the screenshots to connect your API, choose a model and thinking level, receive a first reply, and try a tool.
Harness 0.1.0-rc.7 · Example model tested
Set up the connection, step by step
The screenshots show the Chinese interface. Connection names and addresses are marked as teaching examples; keys are hidden. My API is a name you can choose yourself. API Base URL is a placeholder: replace it with the real address supplied by the platform.
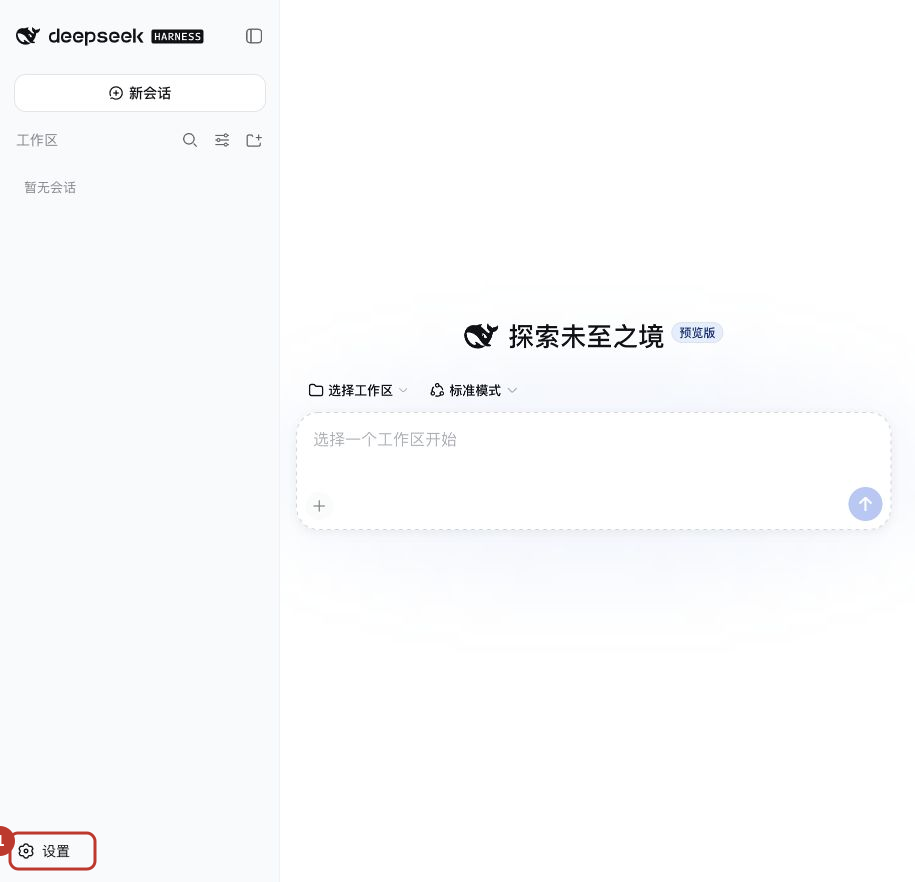
01Open settings
Click Settings (设置) at the bottom left
Expand the sidebar from the top left if it is collapsed.
Chinese interface · Open full-size screenshot
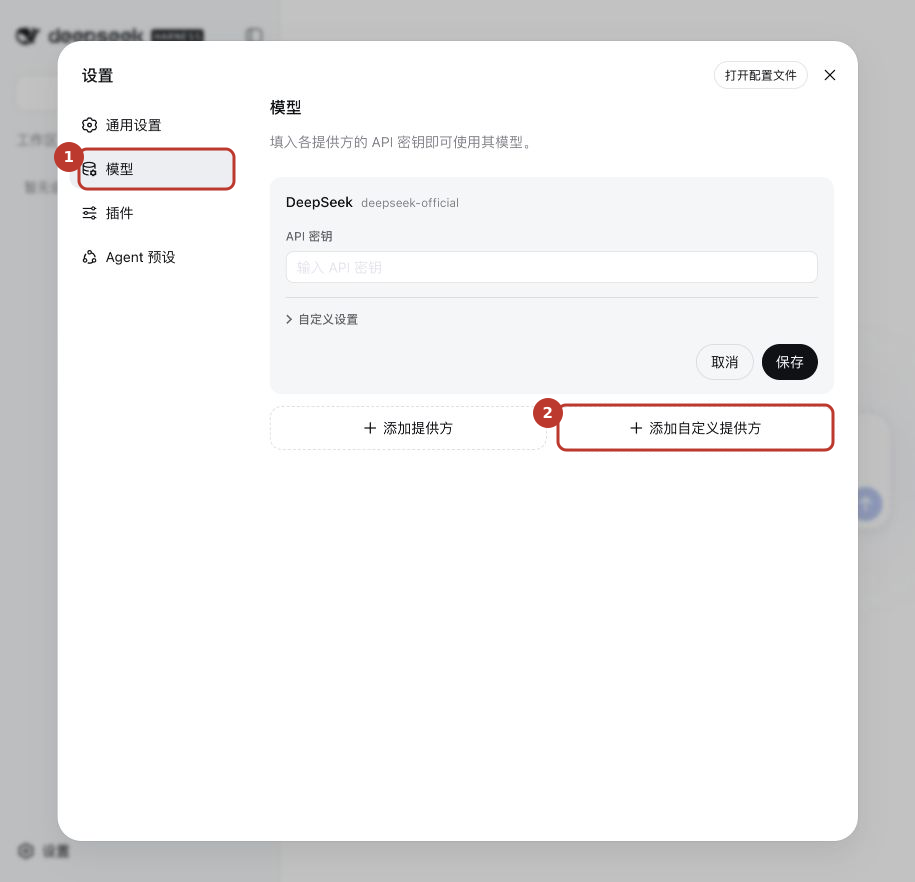
02Add a custom provider
Open Models (模型)
Select it in the settings sidebar.
Add the provider
Click Add custom provider (添加自定义提供方) near the bottom right.
Chinese interface · Open full-size screenshot
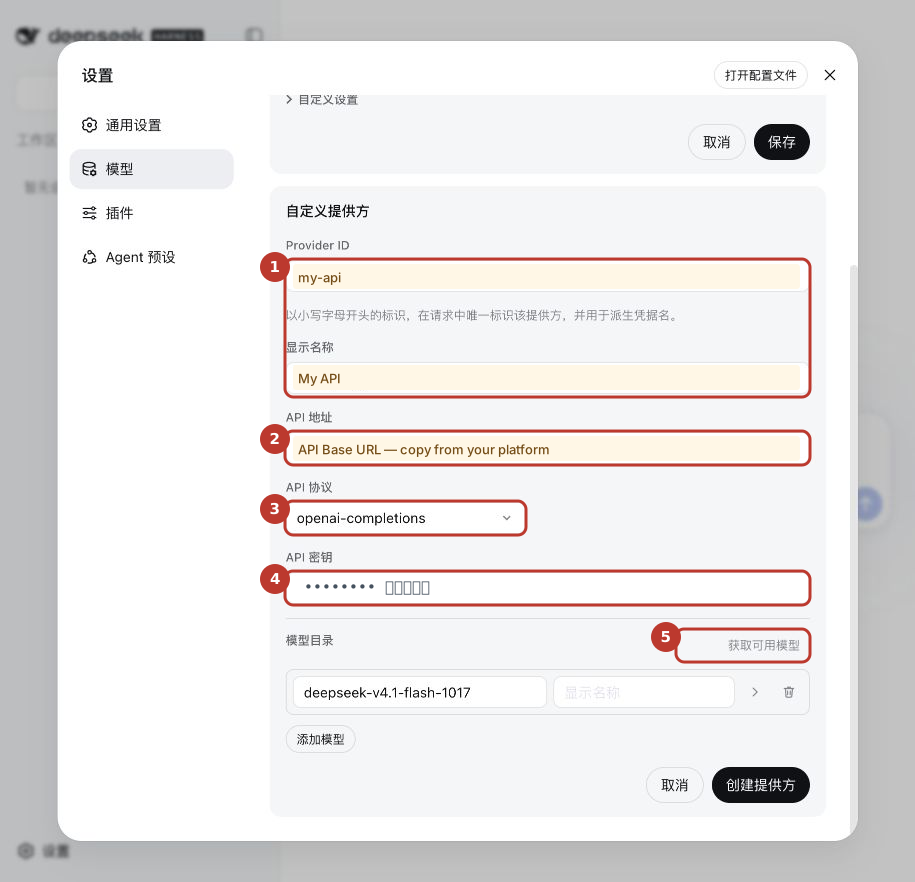
03Fill in the connection details
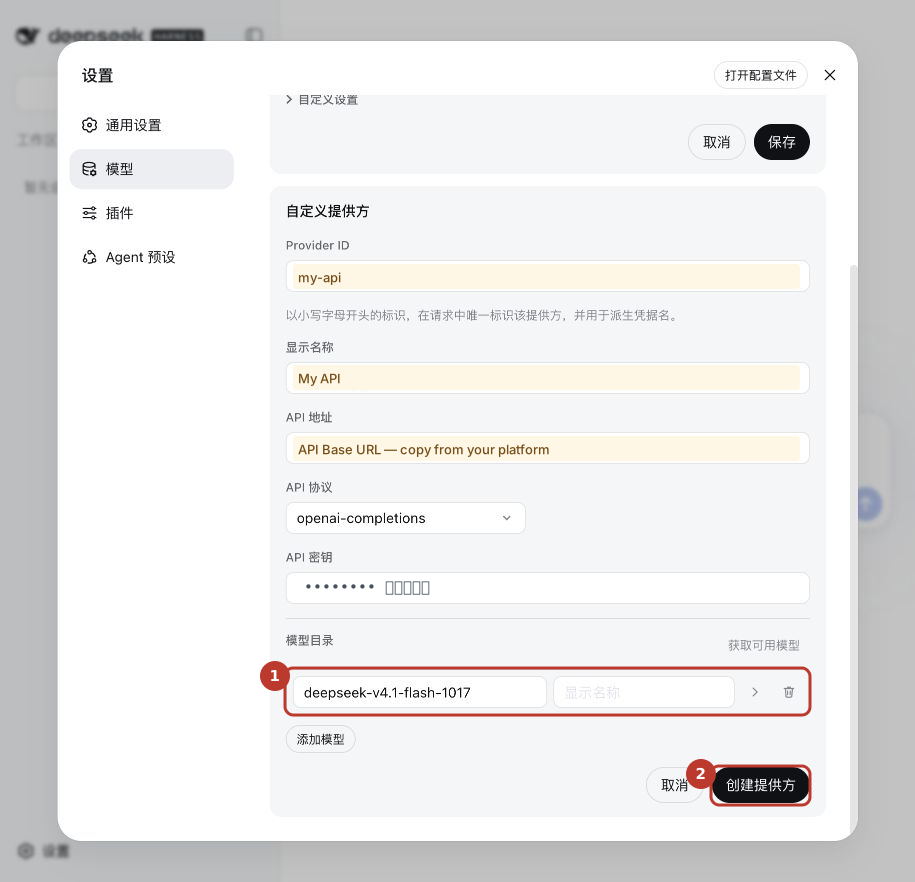
Names
You can use my-api for Provider ID and My API for the display name. They help you recognize this connection and do not have to match the platform brand.
API address
Paste the complete, current API address from the platform. Do not substitute the homepage address or copy the placeholder in the screenshot.
API format
Choose OpenAI Chat Completions, shown as openai-completions in this version.
API key
Paste your complete platform key without extra spaces.
Fetch available models
After filling in the four fields above, click 获取可用模型. Let the app fetch the list before choosing a model.
Chinese interface · Open full-size screenshot
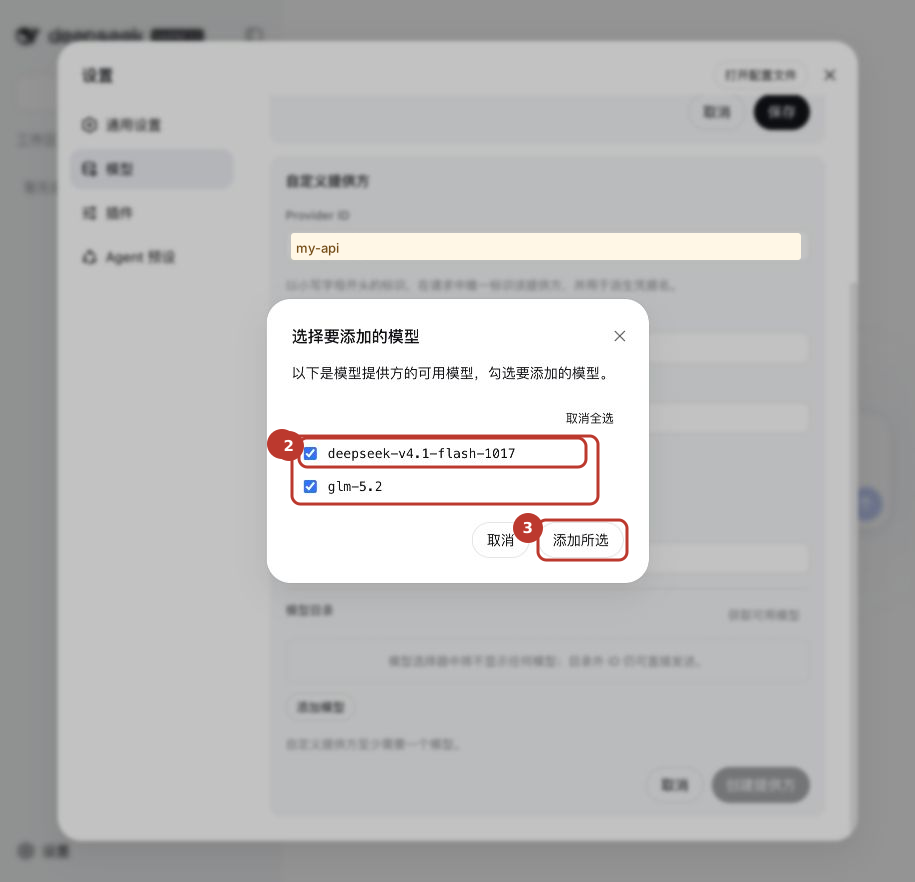
04Select a model and add it
Check the returned list
Our test returned deepseek-v4.1-flash-1017 and glm-5.2. Your available list may differ.
Choose DeepSeek for this example
All models may be selected initially. Keep DeepSeek and deselect glm-5.2 for this walkthrough.
Click Add selected (添加所选)
The chosen model returns to the connection form. This is the button label in the tested version.
Chinese interface · Open full-size screenshot
05Create and save the provider
Check that the model was added
The DeepSeek model you selected should appear below.
Click Create provider (创建提供方)
Use the button at the bottom of the form. Continue once your chosen name, My API in this example, appears in the provider list.
Chinese interface · Open full-size screenshot
06Enable thinking levels for the model
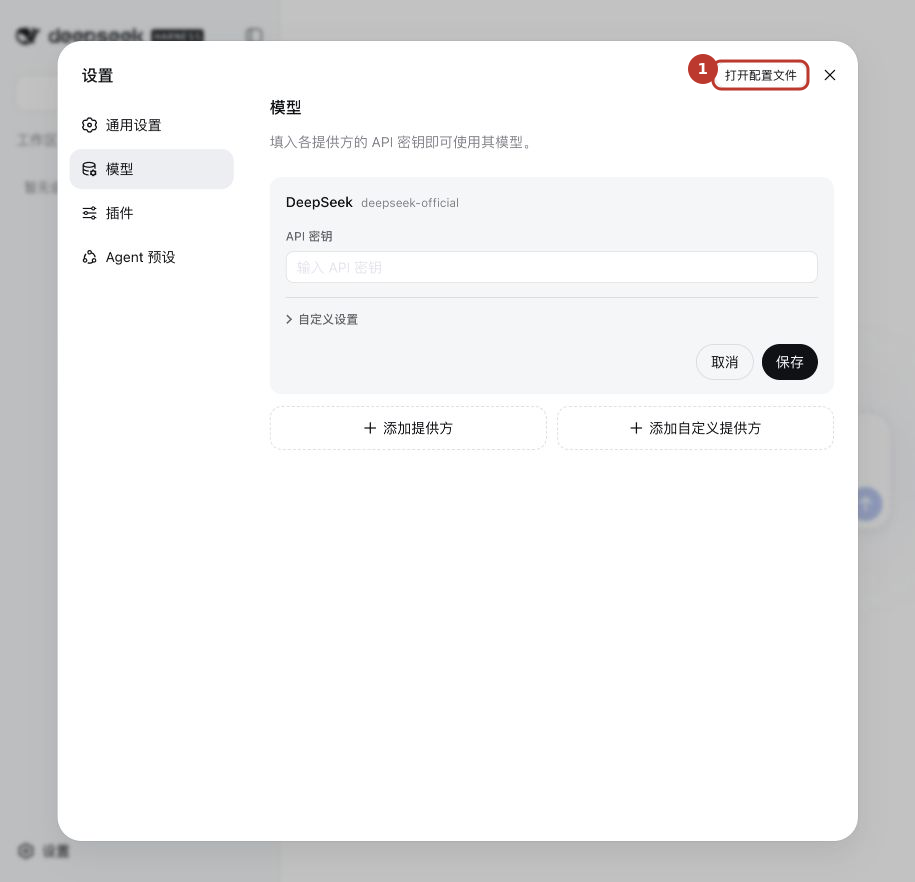
Open the configuration file
This version has no graphical switch for effort levels. Click 打开配置文件 at the top right of settings and open settings.yaml in a text editor.
Find the model you just added
Under your My API provider, find deepseek-v4.1-flash-1017 and add reasoningEfforts as shown below. Do not edit a model with the same ID under another provider.
Save and check the menu
Save, then reopen the model menu. Restart Harness if it has not updated. If your version has Model options → Reasoning levels, you can configure the levels there.
Chinese interface · Open full-size screenshot
Add reasoningEfforts only within the model entry you just created. Keep the existing address, credential reference, and other settings. This is a partial example: do not replace the whole file with it.
models:
  - id: deepseek-v4.1-flash-1017
    reasoningEfforts:
      low: low
      high: high
      max: max
Leading spaces matter. Indent with spaces and keep low, high, and max spelled exactly as shown.
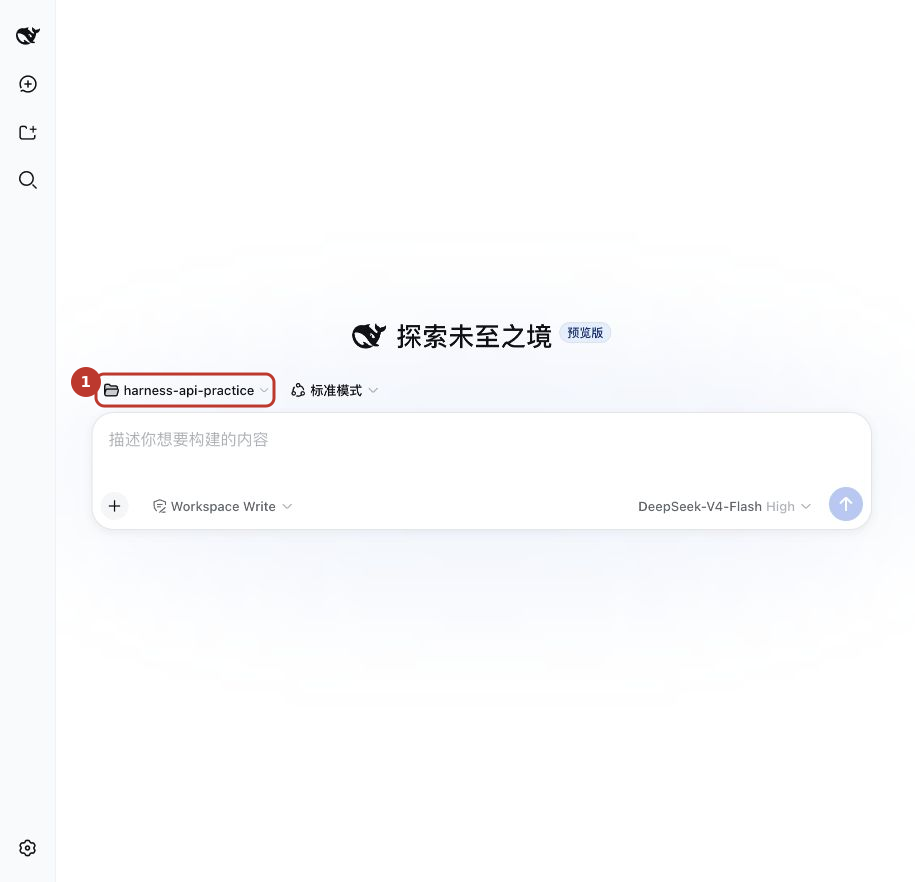
07Choose a workspace
Select a folder first
If the input asks you to choose a workspace (选择工作区), use Add workspace (添加工作区). Select a folder you allow the app to work in; an empty practice folder is a good start.
Check the folder name
The screenshot uses harness-api-practice. You can choose another name. Continue when the folder name is visible.
Chinese interface · Open full-size screenshot
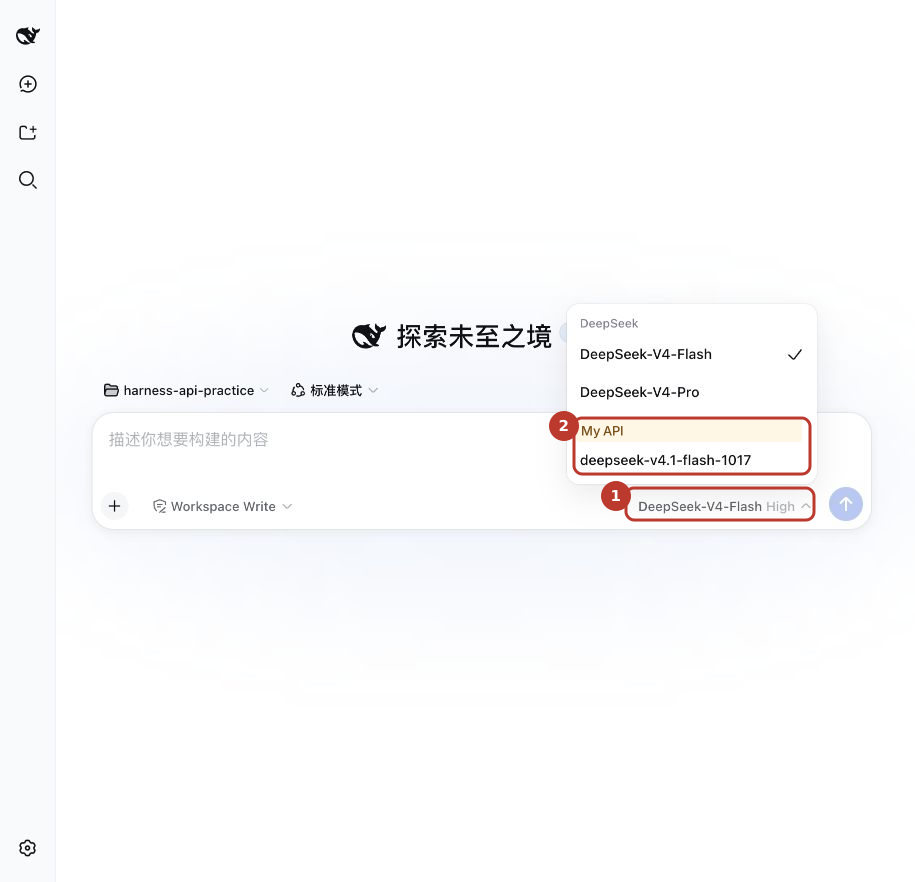
08Choose the model under My API
Open the model menu
Click the current model name at the bottom right of the message box, then open Models (模型).
Choose your configured model
Find the My API group and select deepseek-v4.1-flash-1017. It may display a custom name such as DeepSeek Flash.
Chinese interface · Open full-size screenshot
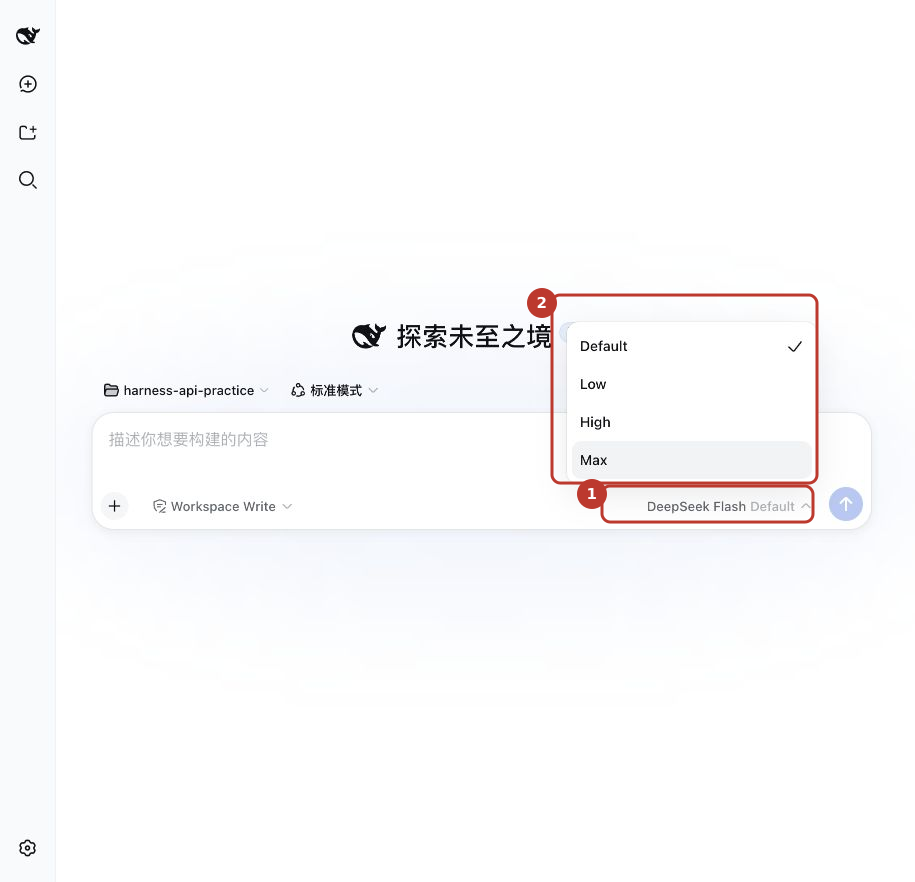
09Choose the thinking level
Open the model menu again
With the My API model selected, click its name at the bottom right and open Reasoning levels (推理等级).
Choose Low, High, or Max
Start with High for everyday tasks; try Max for harder tasks and compare the results and usage on your own work.
Check the selected level
After choosing High, High appears beside the model name. DeepSeek Flash in the image is a display name for the same model.
Chinese interface · Open full-size screenshot
After you select High, the level appears beside the model name.
Displaying the menu and upstream handling of each level are separate checks. Tested Off, Low, High, and Max requests were accepted; the Off sample returned no reasoning usage. Higher levels may take longer and use more tokens, without guaranteeing a better answer.
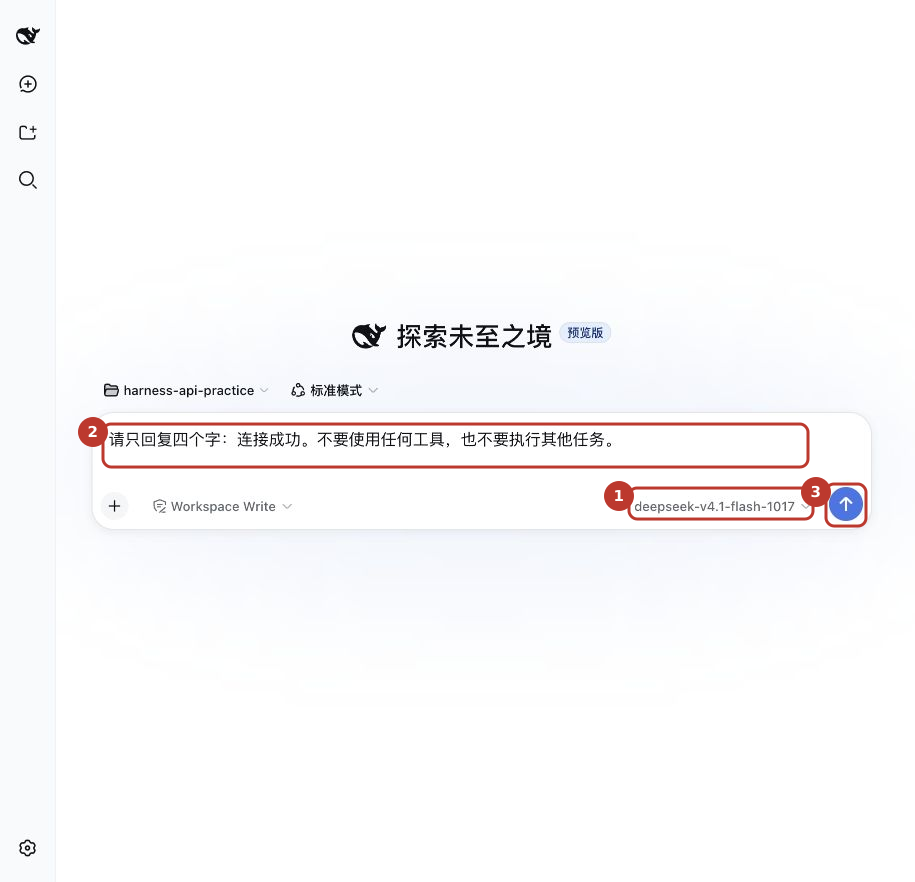
10Send your first message
Check the model
The bottom right should show the DeepSeek model you selected under My API.
Send the test message below
Copy the text below and click the send arrow. Sending uses billable model usage. Wait for the reply.
Chinese interface · Open full-size screenshot
Reply only: Connection successful. Do not use any tools or perform any other tasks.
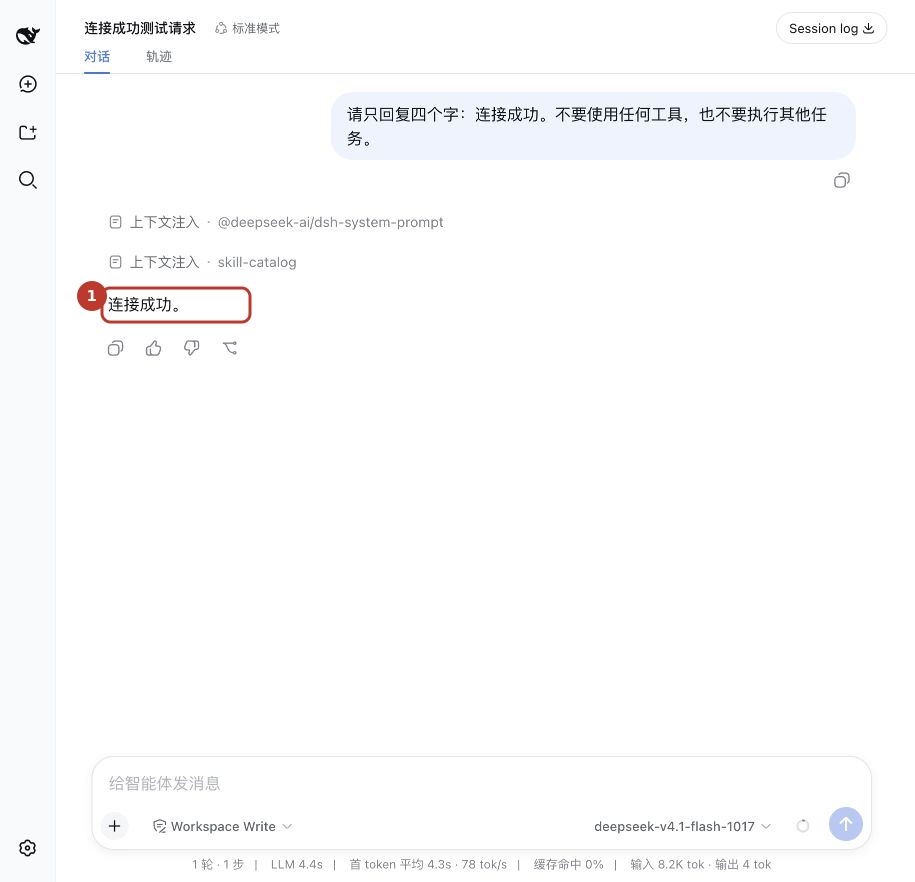
11Receive a reply: the connection works
Check the answer
The test screenshot shows 连接成功。, meaning “Connection successful.” A matching text reply confirms that this chat request worked.
Check usage
Open Usage history on the platform to see the model usage. Next, try the file-reading task below.
Chinese interface · Open full-size screenshot
Connect an installed local Codex client to your API. First distinguish a local client from a cloud task.
Checked against official docs · 2026-11-08
Have these three details ready
With your app already installed, open Self-service on this website and sign in. Create or view your own API key, copy the API address shown there, and copy an exact model ID from Models and pricing. A website homepage, account password or marketing name is not a substitute. Check both account balance and key allowance.
API_HOST, YOUR_API_KEY and YOUR_MODEL_ID below are placeholders: replace each before use. Follow this article on whether to keep /v1; do not append /chat/completions or /responses. Examples do not connect automatically or contain your key.
1. Identify your Codex client
These file settings target Codex CLI and clients that read local configuration, not browser cloud tasks. For a mouse-driven setup, use the Codex branch of the CC Switch guide.
2. Open the configuration file
Open ~/.codex/config.toml on macOS/Linux, or %USERPROFILE%\.codex\config.toml on Windows. Start Codex once if the file is missing. Merge the example below. MY_API_KEY is a variable name, not the key itself.
Field diagram · not an app screenshot
Base URL
https://API_HOST/v1
wire_api
responses
model
YOUR_MODEL_ID
env_key
MY_API_KEY
Configuration example
Keep a copy of your current file first. Update matching entries rather than adding duplicates, and preserve unrelated settings. Do not share a configuration or screenshot containing a real key.
model_provider = "my_api"
model = "YOUR_MODEL_ID"

[model_providers.my_api]
name = "My API"
base_url = "https://API_HOST/v1"
wire_api = "responses"
env_key = "MY_API_KEY"
requires_openai_auth = false
3. Set the key and start
Set MY_API_KEY as shown below, enter the test folder in that same terminal, then run codex. You do not need to replace your existing auth.json. A desktop app launched from its icon may not inherit terminal variables; use CC Switch for that client instead.
When the configuration uses MY_API_KEY, set it in the same terminal from which you start the app. Enter your real key only on your computer. This example shows the syntax; the variable lasts for that terminal session.
macOS / Linux terminal
export MY_API_KEY="YOUR_API_KEY"
codex
Windows PowerShell
$env:MY_API_KEY = "YOUR_API_KEY"
codex
4. Select the model and effort
Use /model to confirm the model. Start with the default or Medium when available. Alternatively put model_reasoning_effort = "medium" at the top level of config.toml, before any [table]. Use only levels accepted by the chosen model.
5. Confirm the API format
Use OpenAI Responses with wire_api = "responses" and retain /v1 in Base URL. Do not copy the Harness Chat Completions choice here. The model also needs compatible streaming and tools; a successful chat alone is insufficient.
Check 1: receive a reply
Create an empty test folder, choose it as the workspace and start a new chat. Confirm the new provider and model are selected, then send the prompt below. A normal reply without an error confirms basic connectivity, not every agent feature. Tests incur normal API usage.
Reply only: Connection successful.
Expected: the app displays “Connection successful.” If you see a login page, an error or endless loading, use the checks below before sending again.
Check 2: read a real file
In that test folder, use a text editor to create hello.txt containing “API connection test 27”. Save it, then send the prompt below. If permission is requested, allow reading only this test folder.
Use the file-reading tool to open hello.txt in the current workspace and tell me its contents. Do not change any files.
Expected: a visible tool execution reading hello.txt, followed by an answer containing API connection test 27. A text answer alone is not evidence of a tool call. You may remove the test folder afterwards.
Troubleshoot by symptom
401 / Invalid API key
Check that the address and complete key belong to the same service and that the key is active. Never send support a full key.
404 / model not found
Check /v1, the exact model ID and the API format. A listed model is not a guarantee of support for every format.
429 / quota / balance
Check balance, key allowance and request rate; follow the returned error. More thinking effort cannot fix a quota problem.
Chat works but files cannot be read
Check model tool support, workspace permissions and the tool execution error.
No effort selector
Check capability declarations, the model and client version. Thinking support does not necessarily include adjustable effort.
Official references and scope
Configuration checked on 2026-11-08. Menus may change with updates; use these official references to verify details. Use the current connection information provided by this platform.
This is Claude Code, not the Claude chat website. Configure the local CLI with a Messages endpoint, or use CC Switch for a graphical setup.
Checked against official docs · 2026-11-08
Have these three details ready
With your app already installed, open Self-service on this website and sign in. Create or view your own API key, copy the API address shown there, and copy an exact model ID from Models and pricing. A website homepage, account password or marketing name is not a substitute. Check both account balance and key allowance.
API_HOST, YOUR_API_KEY and YOUR_MODEL_ID below are placeholders: replace each before use. Follow this article on whether to keep /v1; do not append /chat/completions or /responses. Examples do not connect automatically or contain your key.
1. Confirm model and format
Confirm that the platform currently offers Anthropic Messages for your chosen Claude model. A Chat Completions or Responses URL cannot be substituted directly.
2. Open personal settings
Open ~/.claude/settings.json on macOS/Linux or %USERPROFILE%\.claude\settings.json on Windows. Merge the example env entries, retaining valid JSON and unrelated settings. Do not put a personal key in shared project settings.
3. Fill in address, key and model
ANTHROPIC_BASE_URL is the Messages root. For an address https://API_HOST/v1, this example uses https://API_HOST; preserve any additional platform-specific path as instructed. The client appends /v1/messages. Fill ANTHROPIC_AUTH_TOKEN with your platform key and ANTHROPIC_MODEL with a Messages-compatible model ID.
Field diagram · not an app screenshot
ANTHROPIC_BASE_URL
https://API_HOST
ANTHROPIC_AUTH_TOKEN
YOUR_API_KEY
ANTHROPIC_MODEL
YOUR_MODEL_ID
API format
Anthropic Messages
Configuration example
Keep a copy of your current file first. Update matching entries rather than adding duplicates, and preserve unrelated settings. Do not share a configuration or screenshot containing a real key.
Run claude in the test folder. Use /status to check the address and credential source, then /model to confirm the model. If the old subscription or service is active, check personal settings, environment variables and CC Switch before replacing anything.
5. Choose thinking effort
For a supported Claude model, inspect effort options in /model, or use /effort in versions offering it. Missing controls call for checking the model, version and gateway support; Harness capability checkboxes do not apply here.
Check 1: receive a reply
Create an empty test folder, choose it as the workspace and start a new chat. Confirm the new provider and model are selected, then send the prompt below. A normal reply without an error confirms basic connectivity, not every agent feature. Tests incur normal API usage.
Reply only: Connection successful.
Expected: the app displays “Connection successful.” If you see a login page, an error or endless loading, use the checks below before sending again.
Check 2: read a real file
In that test folder, use a text editor to create hello.txt containing “API connection test 27”. Save it, then send the prompt below. If permission is requested, allow reading only this test folder.
Use the file-reading tool to open hello.txt in the current workspace and tell me its contents. Do not change any files.
Expected: a visible tool execution reading hello.txt, followed by an answer containing API connection test 27. A text answer alone is not evidence of a tool call. You may remove the test folder afterwards.
Troubleshoot by symptom
401 / Invalid API key
Check that the address and complete key belong to the same service and that the key is active. Never send support a full key.
404 / model not found
Check /v1, the exact model ID and the API format. A listed model is not a guarantee of support for every format.
429 / quota / balance
Check balance, key allowance and request rate; follow the returned error. More thinking effort cannot fix a quota problem.
Chat works but files cannot be read
Check model tool support, workspace permissions and the tool execution error.
No effort selector
Check capability declarations, the model and client version. Thinking support does not necessarily include adjustable effort.
Official references and scope
Configuration checked on 2026-11-08. Menus may change with updates; use these official references to verify details. Use the current connection information provided by this platform.
Kimi Code is the agent, not a restriction to Kimi models. With a third-party provider, your configuration chooses the model. This article covers the current CLI.
Checked against official docs · 2026-11-08
Have these three details ready
With your app already installed, open Self-service on this website and sign in. Create or view your own API key, copy the API address shown there, and copy an exact model ID from Models and pricing. A website homepage, account password or marketing name is not a substitute. Check both account balance and key allowance.
API_HOST, YOUR_API_KEY and YOUR_MODEL_ID below are placeholders: replace each before use. Follow this article on whether to keep /v1; do not append /chat/completions or /responses. Examples do not connect automatically or contain your key.
1. Check version and file location
Run kimi --version. The current file is ~/.kimi-code/config.toml, or %USERPROFILE%\.kimi-code\config.toml on Windows. Older versions may use ~/.kimi; consult the docs for your installed version rather than editing both.
2. Add provider and model
Merge the example below. provider = "my_api" must match [providers.my_api]. my-model is a local alias; model is the actual platform ID. The 32768 context value is an example, not a model specification: adjust it to confirmed limits.
Field diagram · not an app screenshot
type
openai / openai_responses
base_url
https://API_HOST/v1
model
YOUR_MODEL_ID
api_key_env
MY_API_KEY
Configuration example
Keep a copy of your current file first. Update matching entries rather than adding duplicates, and preserve unrelated settings. Do not share a configuration or screenshot containing a real key.
api_key_env = "MY_API_KEY" explicitly reads that environment variable. Set it below, run kimi, then use /model to select my-model. /login signs into the official service and does not configure this platform.
When the configuration uses MY_API_KEY, set it in the same terminal from which you start the app. Enter your real key only on your computer. This example shows the syntax; the variable lasts for that terminal session.
macOS / Linux terminal
export MY_API_KEY="YOUR_API_KEY"
kimi
Windows PowerShell
$env:MY_API_KEY = "YOUR_API_KEY"
kimi
4. Choose the format
type = "openai" uses Chat Completions. Change to "openai_responses" only after confirming that route for your model. Both examples retain /v1 in the supplied platform address.
5. Declare supported thinking levels
Recognized models usually get automatic capabilities. For an unrecognized alias, add capabilities = ["tool_use", "thinking"] under [models.my-model] only when supported. Declare support_efforts and default_effort from real capabilities; for a low/high model, use support_efforts = ["low", "high"] and default_effort = "low". A declaration cannot add a capability to a model.
Once low is confirmed for this model, add the separate [thinking] section below to select it. Change effort to another declared value when needed. A global effort overrides the model’s default_effort. Save, run /reload in an idle session, then send a test message.
[thinking]
enabled = true
effort = "low"
Check 1: receive a reply
Create an empty test folder, choose it as the workspace and start a new chat. Confirm the new provider and model are selected, then send the prompt below. A normal reply without an error confirms basic connectivity, not every agent feature. Tests incur normal API usage.
Reply only: Connection successful.
Expected: the app displays “Connection successful.” If you see a login page, an error or endless loading, use the checks below before sending again.
Check 2: read a real file
In that test folder, use a text editor to create hello.txt containing “API connection test 27”. Save it, then send the prompt below. If permission is requested, allow reading only this test folder.
Use the file-reading tool to open hello.txt in the current workspace and tell me its contents. Do not change any files.
Expected: a visible tool execution reading hello.txt, followed by an answer containing API connection test 27. A text answer alone is not evidence of a tool call. You may remove the test folder afterwards.
Troubleshoot by symptom
401 / Invalid API key
Check that the address and complete key belong to the same service and that the key is active. Never send support a full key.
404 / model not found
Check /v1, the exact model ID and the API format. A listed model is not a guarantee of support for every format.
429 / quota / balance
Check balance, key allowance and request rate; follow the returned error. More thinking effort cannot fix a quota problem.
Chat works but files cannot be read
Check model tool support, workspace permissions and the tool execution error.
No effort selector
Check capability declarations, the model and client version. Thinking support does not necessarily include adjustable effort.
Official references and scope
Configuration checked on 2026-11-08. Menus may change with updates; use these official references to verify details. Use the current connection information provided by this platform.
Add your model service in WorkBuddy’s desktop settings without editing a configuration file.
Checked against official docs · 2026-11-08
Have these three details ready
With your app already installed, open Self-service on this website and sign in. Create or view your own API key, copy the API address shown there, and copy an exact model ID from Models and pricing. A website homepage, account password or marketing name is not a substitute. Check both account balance and key allowance.
API_HOST, YOUR_API_KEY and YOUR_MODEL_ID below are placeholders: replace each before use. Follow this article on whether to keep /v1; do not append /chat/completions or /responses. Examples do not connect automatically or contain your key.
1. Find model settings
Open Settings → Models, sometimes labelled Model management. In custom models, click Add model. Expand the account menu at the bottom left if the sidebar is collapsed.
2. Choose Custom and enter credentials
Choose Custom API/provider. Enter the full OpenAI-compatible address supplied by the platform, normally including /v1, and your API Key. Do not retain another vendor’s preset URL or append /chat/completions.
Field diagram · not an app screenshot
Provider
Custom API
Base URL
https://API_HOST/v1
API Key
YOUR_API_KEY
Model ID
YOUR_MODEL_ID
3. Set the model and capabilities
Enter the exact model ID, or fetch models first if that button is available. Enable tools, images and thinking only when supported. Use documented context/output limits. Leave Custom protocol off for this standard OpenAI-compatible setup.
4. Enable levels, then choose in chat
If the form has Supported thinking effort, declare only supported levels and keep the default on Auto initially. Save, select this custom model in chat, then choose effort there. Quick/Balanced/Ultimate modes are not universal effort levels for custom models.
5. Save and select the new model
Click Save, start a new task, open the model picker near the input and choose the model under Custom models. Saving does not ensure the current chat switches. If greyed out, complete the address and API Key in settings.
Check 1: receive a reply
Create an empty test folder, choose it as the workspace and start a new chat. Confirm the new provider and model are selected, then send the prompt below. A normal reply without an error confirms basic connectivity, not every agent feature. Tests incur normal API usage.
Reply only: Connection successful.
Expected: the app displays “Connection successful.” If you see a login page, an error or endless loading, use the checks below before sending again.
Check 2: read a real file
In that test folder, use a text editor to create hello.txt containing “API connection test 27”. Save it, then send the prompt below. If permission is requested, allow reading only this test folder.
Use the file-reading tool to open hello.txt in the current workspace and tell me its contents. Do not change any files.
Expected: a visible tool execution reading hello.txt, followed by an answer containing API connection test 27. A text answer alone is not evidence of a tool call. You may remove the test folder afterwards.
Troubleshoot by symptom
401 / Invalid API key
Check that the address and complete key belong to the same service and that the key is active. Never send support a full key.
404 / model not found
Check /v1, the exact model ID and the API format. A listed model is not a guarantee of support for every format.
429 / quota / balance
Check balance, key allowance and request rate; follow the returned error. More thinking effort cannot fix a quota problem.
Chat works but files cannot be read
Check model tool support, workspace permissions and the tool execution error.
No effort selector
Check capability declarations, the model and client version. Thinking support does not necessarily include adjustable effort.
Official references and scope
Configuration checked on 2026-11-08. Menus may change with updates; use these official references to verify details. Use the current connection information provided by this platform.
CC Switch manages configurations. It does not answer prompts itself: after enabling a provider, run the agent it manages.
Checked against official docs · 2026-11-08
Have these three details ready
With your app already installed, open Self-service on this website and sign in. Create or view your own API key, copy the API address shown there, and copy an exact model ID from Models and pricing. A website homepage, account password or marketing name is not a substitute. Check both account balance and key allowance.
API_HOST, YOUR_API_KEY and YOUR_MODEL_ID below are placeholders: replace each before use. Follow this article on whether to keep /v1; do not append /chat/completions or /responses. Examples do not connect automatically or contain your key.
1. Choose the target client
Select Codex or Claude Code in the sidebar, then + / Add provider. These tabs write different client configurations. Follow only the branch for your client below.
2. Create a custom provider
Choose custom configuration, name it My API and enter your own API Key. Do not retain a different API platform’s preset address. Check the target client before saving.
3. Codex branch: Responses
Choose Responses, use https://API_HOST/v1 and an available Responses model ID. Check wire_api = "responses" in the configuration preview. Select only effort levels supported by that model.
Field diagram · not an app screenshot
Codex
Responses · https://API_HOST/v1
Claude Code
Messages · https://API_HOST
API Key
YOUR_API_KEY
Provider name
My API
4. Claude Code branch: Messages
Choose Anthropic Messages, use the supplied Messages root (https://API_HOST here) and ANTHROPIC_AUTH_TOKEN. Sonnet/Opus/Haiku mappings are client slots: map them only to available, confirmed-compatible models.
5. Enable and verify in the actual agent
Save, click Enable on the provider card and confirm it is active. Reopen the target client or terminal. Start with direct connection; local routing and aggregation are unnecessary for this setup. Perform the two checks below inside Codex or Claude Code. An enabled card alone does not prove connectivity.
Check 1: receive a reply
Create an empty test folder, choose it as the workspace and start a new chat. Confirm the new provider and model are selected, then send the prompt below. A normal reply without an error confirms basic connectivity, not every agent feature. Tests incur normal API usage.
Reply only: Connection successful.
Expected: the app displays “Connection successful.” If you see a login page, an error or endless loading, use the checks below before sending again.
Check 2: read a real file
In that test folder, use a text editor to create hello.txt containing “API connection test 27”. Save it, then send the prompt below. If permission is requested, allow reading only this test folder.
Use the file-reading tool to open hello.txt in the current workspace and tell me its contents. Do not change any files.
Expected: a visible tool execution reading hello.txt, followed by an answer containing API connection test 27. A text answer alone is not evidence of a tool call. You may remove the test folder afterwards.
Troubleshoot by symptom
401 / Invalid API key
Check that the address and complete key belong to the same service and that the key is active. Never send support a full key.
404 / model not found
Check /v1, the exact model ID and the API format. A listed model is not a guarantee of support for every format.
429 / quota / balance
Check balance, key allowance and request rate; follow the returned error. More thinking effort cannot fix a quota problem.
Chat works but files cannot be read
Check model tool support, workspace permissions and the tool execution error.
No effort selector
Check capability declarations, the model and client version. Thinking support does not necessarily include adjustable effort.
Official references and scope
Configuration checked on 2026-11-08. Menus may change with updates; use these official references to verify details. Use the current connection information provided by this platform.
First declare the model’s available thinking levels, then choose a level in chat. The two steps are shown below.
Enable the available levels
06Enable thinking levels for the model
Open the configuration file
This version has no graphical switch for effort levels. Click 打开配置文件 at the top right of settings and open settings.yaml in a text editor.
Find the model you just added
Under your My API provider, find deepseek-v4.1-flash-1017 and add reasoningEfforts as shown below. Do not edit a model with the same ID under another provider.
Save and check the menu
Save, then reopen the model menu. Restart Harness if it has not updated. If your version has Model options → Reasoning levels, you can configure the levels there.
Chinese interface · Open full-size screenshot
Add reasoningEfforts only within the model entry you just created. Keep the existing address, credential reference, and other settings. This is a partial example: do not replace the whole file with it.
models:
  - id: deepseek-v4.1-flash-1017
    reasoningEfforts:
      low: low
      high: high
      max: max
Leading spaces matter. Indent with spaces and keep low, high, and max spelled exactly as shown.
Choose a thinking level
09Choose the thinking level
Open the model menu again
With the My API model selected, click its name at the bottom right and open Reasoning levels (推理等级).
Choose Low, High, or Max
Start with High for everyday tasks; try Max for harder tasks and compare the results and usage on your own work.
Check the selected level
After choosing High, High appears beside the model name. DeepSeek Flash in the image is a display name for the same model.
Chinese interface · Open full-size screenshot
After you select High, the level appears beside the model name.
Displaying the menu and upstream handling of each level are separate checks. Tested Off, Low, High, and Max requests were accepted; the Off sample returned no reasoning usage. Higher levels may take longer and use more tokens, without guaranteeing a better answer.
Next, try one agent tool call
Create hello.txt inside your practice folder and write a sentence you know. Then send Harness the request below.
Read hello.txt and tell me what the first line says.
If the activity log shows a file read and the answer matches the first line, you have completed a simple tool call. Receiving a normal chat reply alone does not verify tools.
Workspace and permissions
07Choose a workspace
Select a folder first
If the input asks you to choose a workspace (选择工作区), use Add workspace (添加工作区). Select a folder you allow the app to work in; an empty practice folder is a good start.
Check the folder name
The screenshot uses harness-api-practice. You can choose another name. Continue when the folder name is visible.
Chinese interface · Open full-size screenshot
If you get stuck
The model list will not load
Check the complete API address, the validity of the key, and whether your network can reach the address.
There is no effort menu
Complete step 6 for the model you selected, then open the model menu again.
Chat works, but files cannot be read
Check the selected workspace and whether the current mode allows file reads.
Invalid key or insufficient balance
Check that the key was copied completely, then check both the account balance and the key’s own allowance.